
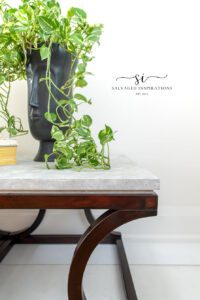
Hey readers! It’s Denise from Salvaged Inspirations, come read about this Faux but Fabulous Stone Tabletop. I’m salvaging a 2 in 1 curb-shopped coffee table with a Faux Stone Table Top.
Material List:
-
DBP White Lightning Cleaner
-
DBP Sanding Sponge
-
DBP Dixie Belle Mud Brown
-
DBP Colonial Black Gel Stain
-
DBP Cotton Chalk Mineral Paint
-
DBP Baja Gray Silk Paint
-
DBP Coffee Bean Chalk Mineral Paint
-
DBP Synthetic Brushes
-
DBP Fine Mist Spray Bottle
-
DBP Flat Clear Coat
Step 1: Prep
Once I got it home I gave it a good once over. The table was structurally perfect but it did have some cosmetic issues to deal with.Nothing a little Dixie Belle Mud and faux finish can’t fix right up!
 \
\
I was REALLY curious how this convertible table was going to look as two side tables. The first thing I did was disassemble it.

To clean this table I used White Lightening Cleaner in a spray bottle and a regular old sponge. While cleaning, I made sure to spray and wipe in all the crevices and underneath as well! With the table taken apart, it really helped me get into all the nooks and crannies.

Step 2: Stain
To prep for this gel stain, I scuff sanded with a Dixie Belle 220-grit sanding pad. This is to scuff up the finish – NOT to scratch it up. Gel stain won’t cover scratches or dings so I was mindful of the pressure I applied.Once I had the two bases scuff-sanded, I used cloth to remove all the remaining dust.

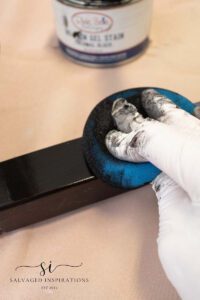
I used my black gel stain. This would allow some of the grain and original warmth to show through while giving the base a beautiful rich finish.This No-Pain-Gel-Stain can be used to darken an existing finish. I mixed the oil-based gel stain really well before using it and then used my mixer stick to apply a small amount to the sponge and then wiped it onto the legs. Right away the base took on a richer look.
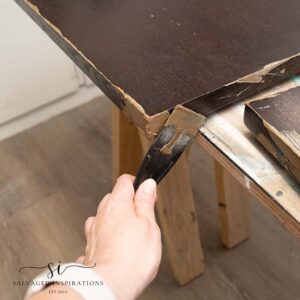
While the bases were drying I moved on to the table tops. I fixed the missing edge banding and filled in all the scratches using this wood filler.
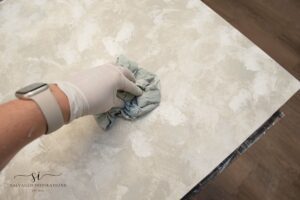
Step 3: Faux Table Tops
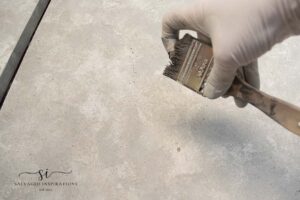
Step 4: Finishing Touches
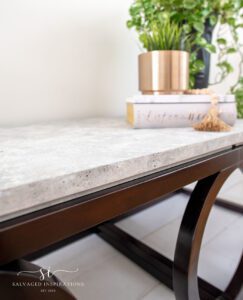
I’ll be spraying a flat topcoat onto this 2 in 1 table but because I used the oil-based gel stain, I need to wait at least 72 hours for it to fully dry before top coating. And check out this ‘stone’ top!
To see more of this Faux but Fabulous Stone Tabletop, head over to Salvaged Inspirations to read all about it.


I love this!!! Written out perfectly with all the right paints to use. I always forget about the silk line and how it can be incorporated into projects with also chalk paint, or incorporating it into projects that aren’t just 1 color.
Love this technique, so pretty. Thanks for sharing!
Our pleasure, Julie. Thanks for reading!
People are just so creative , I love this and am going to try it !!! Thanks so much !!