
As the crisp autumn air sweeps in and leaves dance in hues of gold and amber, there’s no better time to embrace the cozy charm of DIY crafts. With Thanksgiving just around the corner, Dixie Belle Paint is thrilled to bring you a delightful project that will add a touch of rustic elegance to your seasonal decor. Now, come join us as we dive into the world of pumpkin garlands, a craft created by none other than Tammy, the talented mind behind White Lilac Farmhouse.
In a world where creativity knows no bounds, White Lilac Farmhouse stands as a beacon of inspiration, sharing heartwarming DIY projects that effortlessly blend rustic charm with modern elegance. Known for her impeccable taste and a keen eye for design, the author brings a wealth of experience and passion to the table.
In this blog post, we’ll take you on a journey through the steps and techniques needed to create your very own pumpkin garland masterpiece using Dixie Belle Paint products. So, grab your brushes, and a cup of warm cider, and let’s get started on this heartwarming Thanksgiving project!
The following is an excerpt from White Lilac Farmhouse. Click here to read the original blog.
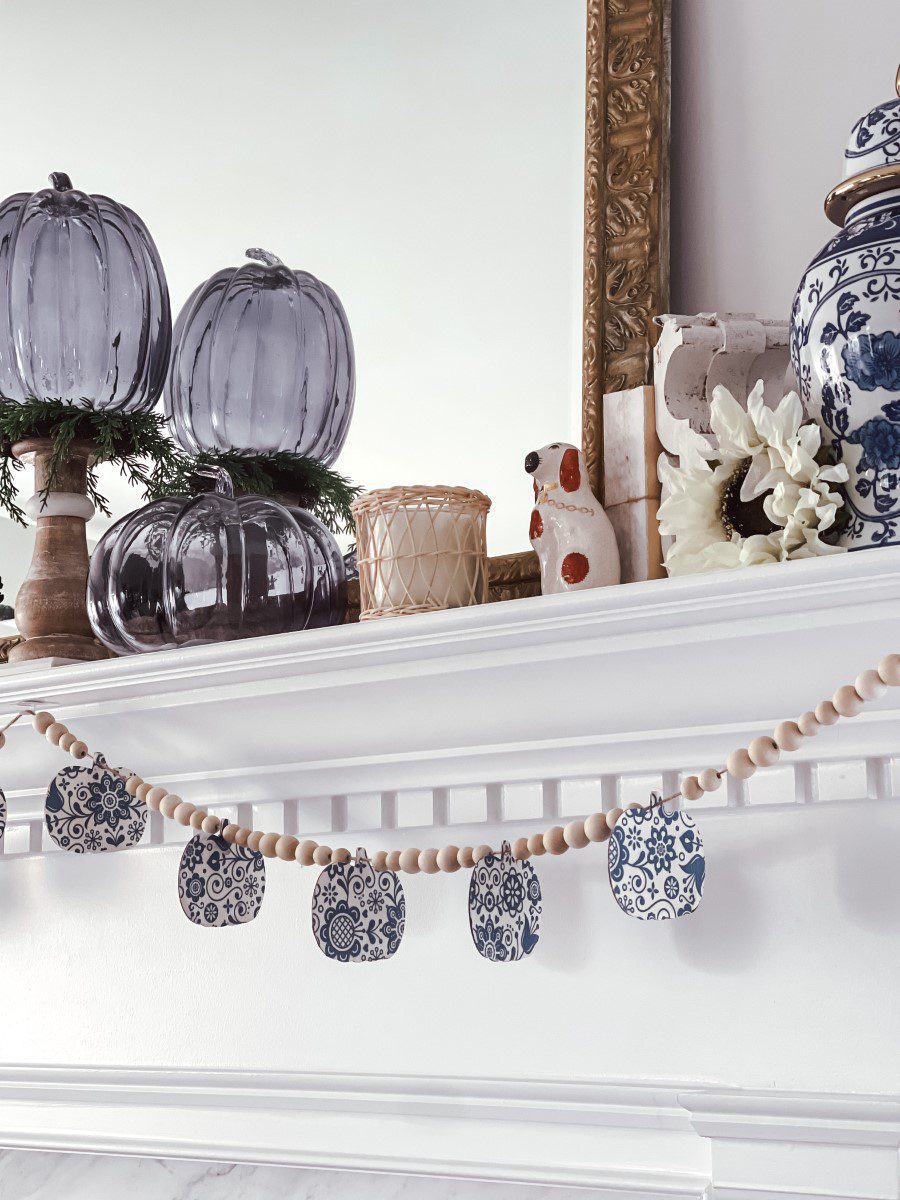
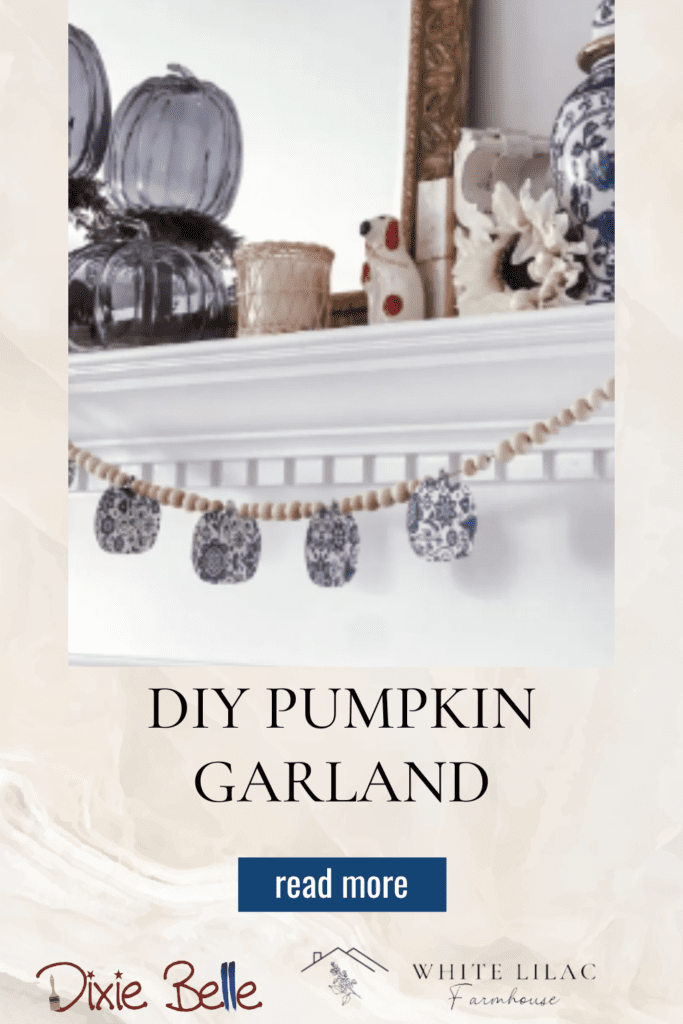
Add a touch of elegance to your fall decor with a beautiful DIY pumpkin garland. This craft project is super easy to make for your home. Whether you are crafty or not, this project is fun and easy for you to create. It uses pumpkins, beads, rice paper, and paint. This beautiful versatile garland features decoupage pumpkins of blue and white pumpkins, strung together on twine. You can customize your garland to any color or pattern of rice paper.
It is fun and easy to create this lovely DIY pumpkin garland for your fall decorations. This elegant garland is perfect for hanging on your mantel, fireplace, or doorway for fall and Thanksgiving. Let me teach you how to make this DIY pumpkin garland. Gather your items and enjoy creating, my friend!
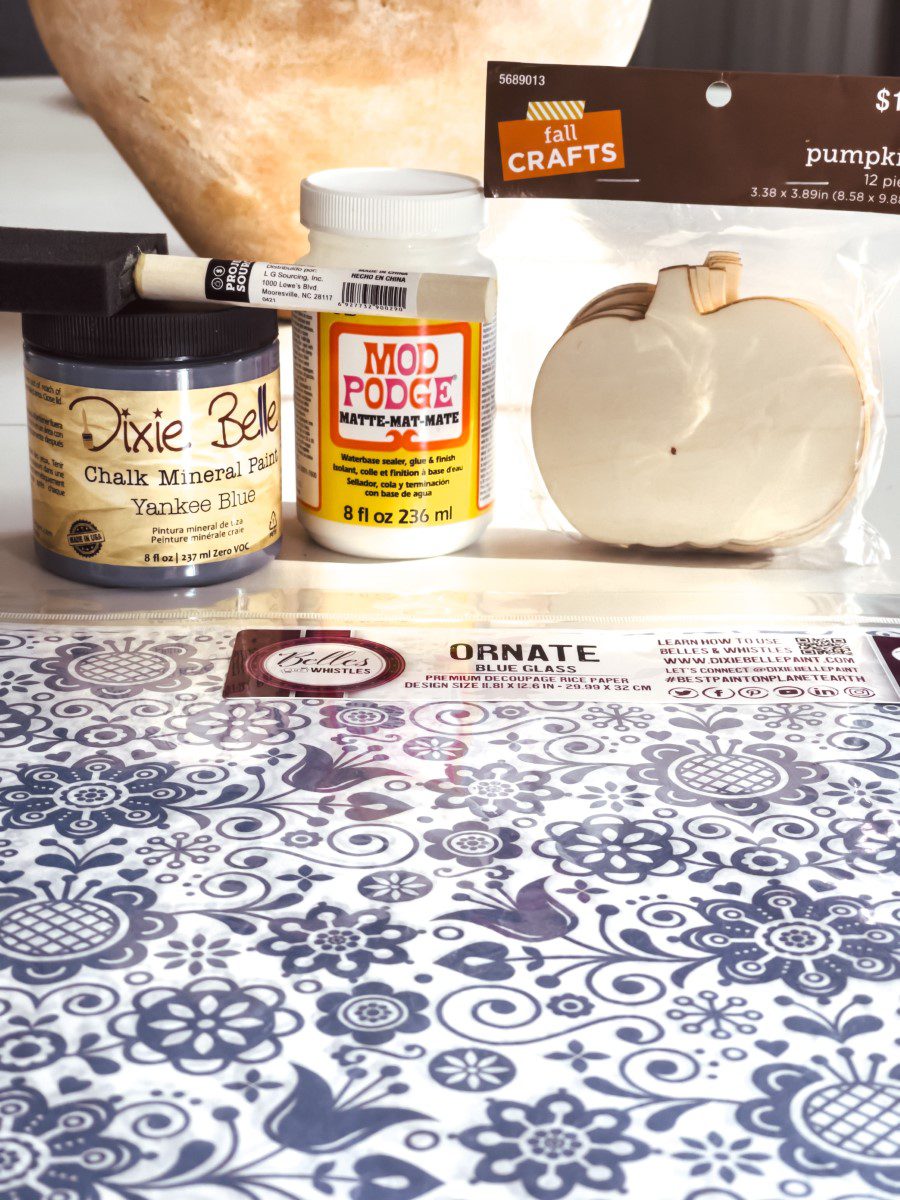
Materials Used:
-
Dixie Belle Chalk Mineral Paint in Yankee Blue
-
Dixie Belle Paint Blue Glass Ornate – Rice Decoupage Paper
-
Dixie Belle Paint Satin Clear Coat
-
10 unfinished wood pumpkins
-
Modge Podge
-
Wooden Beads
-
Twine
-
Scissor
-
Sanding block
-
Dixie Belle Paint’s Artist Paint Brush
-
Drill (optional if pumpkins have predrilled holes)
Step One: Painting the Pumpkin with Dixie Belle Paint
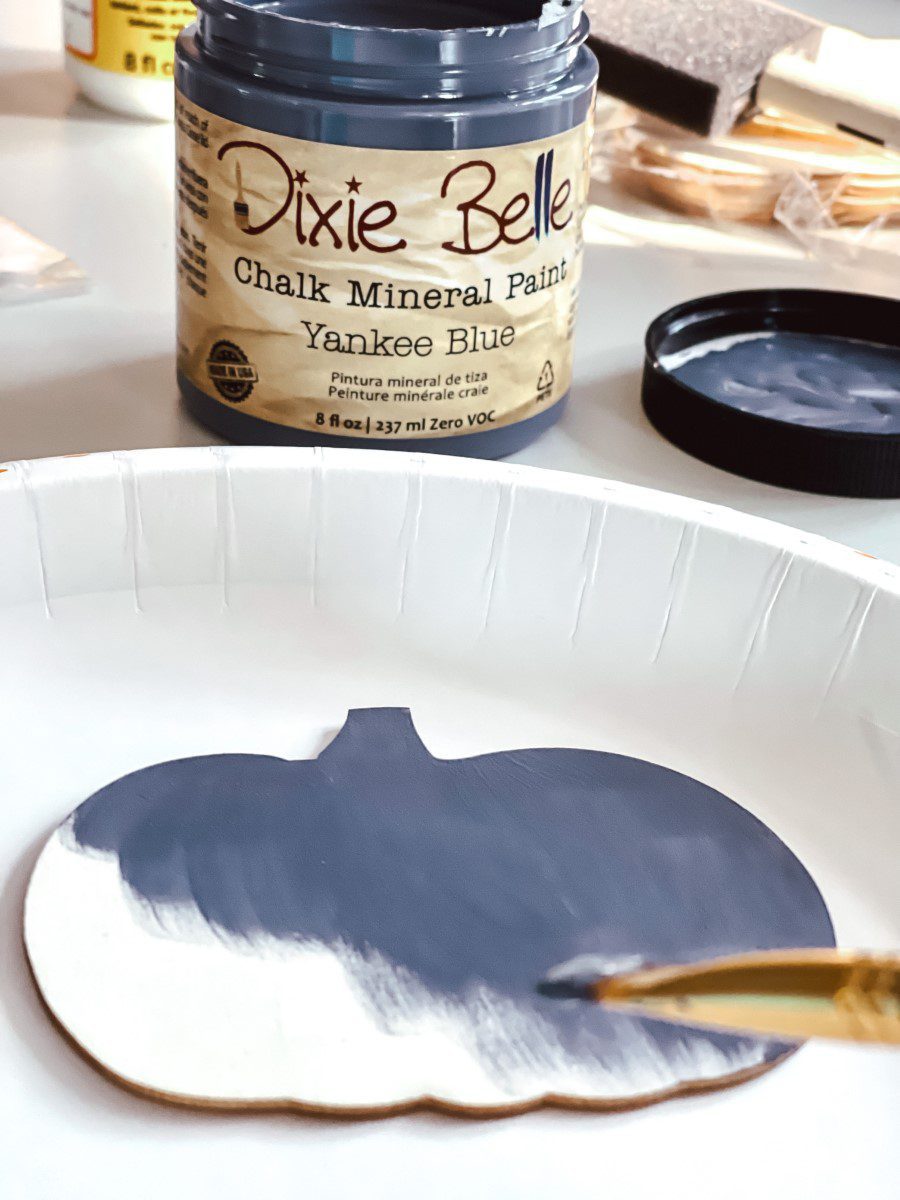
On one side of the pumpkin, paint it in the Chalk Mineral Paint. I am using the color Yankee Blue. This color coordinates perfectly with the Blue Glass Ornate – Rice Decoupage Paper.
However, keep in mind you will need to apply two coats to give the pumpkins a nice rich color. The first coat will dry very fast as it soaks into the unfinished wood. I painted the second coat within 20 minutes. Dixie Belle Paints has wonderful products for furniture and crafts.
Use Dixie Belle Paint Clear Coat in a Satin Finish that can be used to protect your painted pumpkins. This step is completely optional. My plan is to hang the pumpkin garland on my mantel. It will not get a lot of wear and tear in this spot. To protect it for storage later, you can wrap tissue paper around the pumpkins.
Step Two: Modge Podge
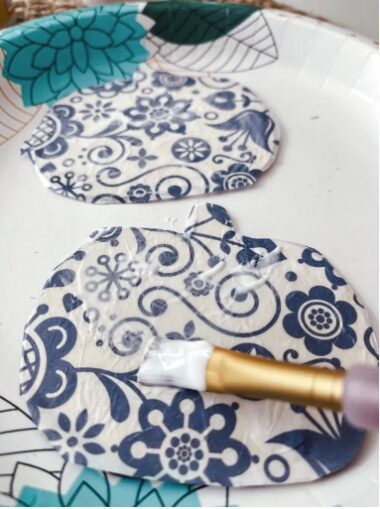
First, cut your rice decoupage paper into squares that are large enough to cover the pumpkin shape. Two sheets will cover 10 of the pumpkins.
Add a generous amount of Modge Podge to cover the surface of the pumpkin. With your finger smooth out any air bubbles. If any of the edges are lifting, apply more Modge Podge. Allow the Modge Podge to completely dry.
The next step before adding the top coat of Modge Podge would be to trim and sand the sides of the pumpkin. After you have trimmed the sides, apply the Modge Podge all over the surface of the rice paper. Allow the pumpkin tops to completely dry.
Step Three: Trim and Sand
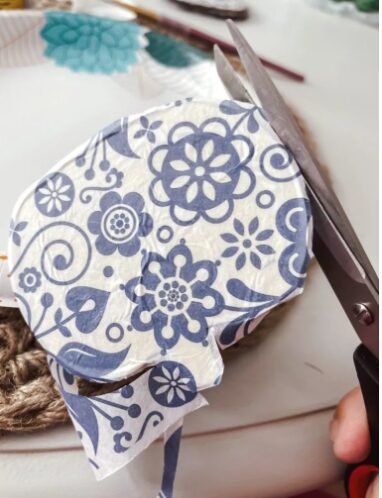
The Blue Glass Ornate – Rice Decoupage Paper by Dixie Belle Paint’s Belles and Whistles line will be heavier in weight than using tissue paper. After the pumpkins have completely dried.
You can use a pair of scissors to trim around the edges. You can also use a sanding block or sandpaper around the edges.
Step Four: String Beads and Pumpkins

I have a tip for you when working with twine. Surprisingly, the ends of twine tend to unravel. Therefore, try using a piece of clear Scotch Tape to the end. You wrap it around the end of the twine and give it a good squeeze to tighten it. Cut off any extra tape. It works like a charm.
To me, this is the fun part of adding all of the beads and pumpkins. I am using the beads raw. You can stain or paint them. I am going for a Scandinavian look with this blue and white garland. You can use as many or as little beads in between your pumpkins. I like to use various sizes of beads to add visual interest to the garland.
Step Five: Hanging the Pumpkin Garland
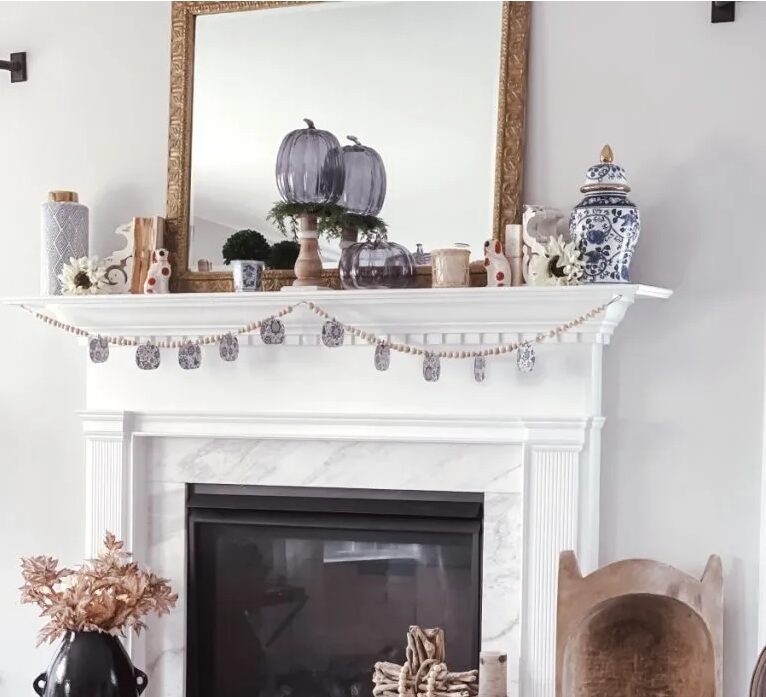
Finally, at each end of the garland tie the twine into a loop knot. Trim any extra twine. I put a command hook at each end of my mantel and one in the middle. The end loops were placed on the command hook. Lastly, in the middle, the twine from the garland is draped over the hook.
What do you think of this simple DIY pumpkin garland? I like it better than any store-bought garland. Why? Because there is something about being creative. This project was super easy for any level of crafter. The Blue Glass Ornate – Rice Decoupage Paper looks so elegant on these inexpensive pumpkins. Love how the garland coordinates with my fall decorations in the family room.
How beautiful did this pumpkin garland turn out? With the hole in the top of my pumpkins, they face to the side. If you want them to face to the front, you can drill a hole on each side of the pumpkin. Sting the twine through the sides and add your beads. Another fun option is to flip every other pumpkin. Meaning some will have the blue side and others will have the blue and white sides. (End)
Enjoy Your Pumpkin Garland
As the leaves continue to fall and the aroma of pumpkin pie fills the air, we hope this pumpkin garland DIY, using Dixie Belle Paint, has inspired you to infuse your home with the warmth and charm of the season. Thanksgiving is a time for reflection, gratitude, and creativity, and there’s no better way to express those sentiments than through the art of crafting with Dixie Belle Paint. We encourage you to follow White Lilac Farmhouse for more incredible DIY inspirations and seasonal decor ideas, all of which can be beautifully enhanced with Dixie Belle Paint’s wide line of products.
In the end, it’s the personal touches, the memories you create, and the joy in crafting that make this time of year truly special. May your home be filled with love, laughter, and the cozy allure of autumn, all enhanced by the magic of Dixie Belle Paint. From our paintbrushes to yours, happy crafting, and have a wonderful Thanksgiving!


What a fun way to use decoupage!
The possibilities are endless!