Welcome to our guest blog! Today, Tammy from Rustic Orchard Home will show you how to make a charming hand-painted scarecrow door hanger. Whether you’re a crafting pro or a beginner, Tammy’s tips will help you create a welcoming fall decoration for your front door.
(The following is an excerpt from Rustic Orchard Home. Read the full article here.)


Supplies you’ll need to make your own Scarecrow Door Hanger:
- Scarecrow Door Hanger Cutout
- Terracotta Dixie Belle Chalk Paint
- Fluff Dixie Belle Chalk Paint
- Rusty Nail Dixie Belle Chalk Paint
- Burlap Dixie Belle Chalk Paint
- Colonel Mustard Dixie Belle Chalk Paint
- Coffee Bean Dixie Belle Chalk Paint
- Chocolate Dixie Belle Chalk Paint
- Antebellum Blue Dixie Belle Chalk Paint
- Bright White Chalkology Paste
- Small Squeegee
- Makeup Sponges
- Water Wipes
- Four Texture Patterns Transfer
- Artist Brush Set
- Starbond Medium Instant Adhesive
Step 1: Prepare the cutout
I started this project by first marking where the hat will sit on the scarecrow. This step provides a helpful guide for the painting process.


Step 2: Paint the scarecrow’s face
To begin, I started by mixing a small amount of Terracotta with Fluff. As a result, I achieved a very pale peach tone, which I then used for the face of the scarecrow.


Next, I applied that mixture using a water wipe. By using water wipes, I was able to apply a light coat of paint, which in turn helped to speed up the painting process.
To create the cheek blush, I first dabbed a bit of Terracotta into the mixture I used for the face. This step should result in a very light blush color, which can then be applied in a circular pattern on either side of the mouth.


For the nose, I first applied a layer of the color Terracotta.


Then I mixed a bit of Terracotta with the color Rusty Nail, which will be used to highlight the nose.


Step 3: Paint the sunflower
Burlap was used on the hat and brim, which was applied with another water wipe.


Next, I moved on to the sunflower. I used a water wipe to apply the paint, just as I had previously.
First I applied the color Colonel Mustard, and then carefully went back over all the etched spots to remove any excess paint.
Then, using a water wipe, I applied the color Coffee Bean to fill in the center portion.


Step 4: Paint the hat and brim
To start, I watered down the color Chocolate and applied it to the hat and brim using a makeup sponge. As I dabbed the paint onto the surface, I simultaneously misted it with water, which helped create a “dirty” look. My goal was to make the hat appear as though it had rolled around in the dirt a bit.


Step 5: Paint the scarf
Next, I used my favorite fall blue color, Antebellum Blue on the scarf!


Step 6: Paint the hair pieces
The hair pieces are painted with a custom blend of Fluff and Colonel Mustard, resulting in a raffia/straw look.
You can also enhance the texture by adding highlights as you see fit. As shown below, I’ve used highlighting to create the “texture” on the hair pieces.


Step 7: Paint the remaining elements
The color Kudzu was used for the greenery, and then the color Fluff for the word “hello.”


To create the word “fall,” I started with Terracotta and then lightly highlighted it with Rusty Nail, similar to what I did on the nose.
For the center of the flower piece, I began with Chocolate and then stippled in a bit of Colonel Mustard for added dimension.


Step 8: Assemble all of the pieces
Finally, it’s time to glue all the pieces together! Note that the sunflower only fits in one specific way, so start by gluing it in place first. Once that’s secure, proceed with gluing the greenery—trust me, this order makes all the difference.
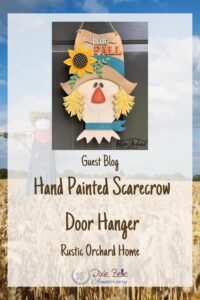
Here is the final look! It’s just perfect for Fall.


And the best part is, you can change up the colors to create something that will fit your style best.


Thanks for crafting with us! We hope Tammy’s scarecrow door hanger inspires your fall decorations. For more DIY ideas, check out our blog, Craft a Warm Autumn Welcome Wreath with Dixie Belle Paint Products. Happy crafting!