
Happy Fall Y’all! We’re thrilled to give you a warm Southern welcome to the enchanting world of Dixie Belle Paint! We will be your humble guide to the creative wonders of Do Dodson, who is here to share the joy of fall crafting with a touch of Dixie Belle charm. As the leaves start to dance in the crisp autumn breeze, what better way to embrace the season than by bringing a touch of rustic warmth to your home? Whether you’re a seasoned crafter or just starting out, Dixie Belle Paint is your ticket to transforming ordinary wooden pieces into extraordinary fall wonders. Join me as we explore the vibrant hues, effortless techniques, and that unmistakable Dixie Belle Paint touch that’ll have your pumpkins stealing the spotlight at every harvest gathering.
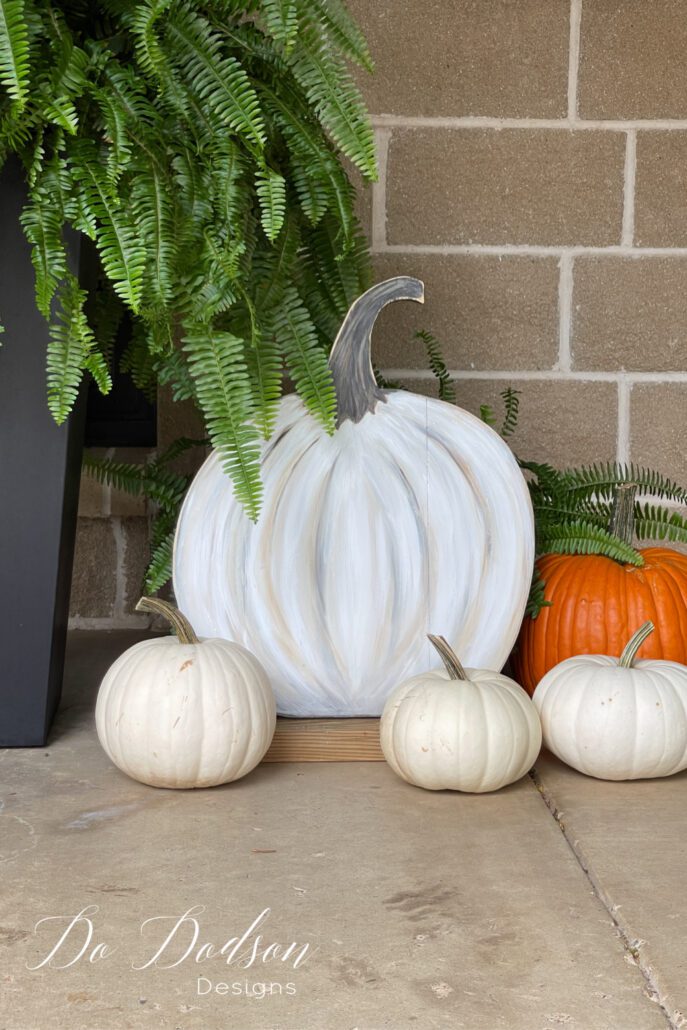
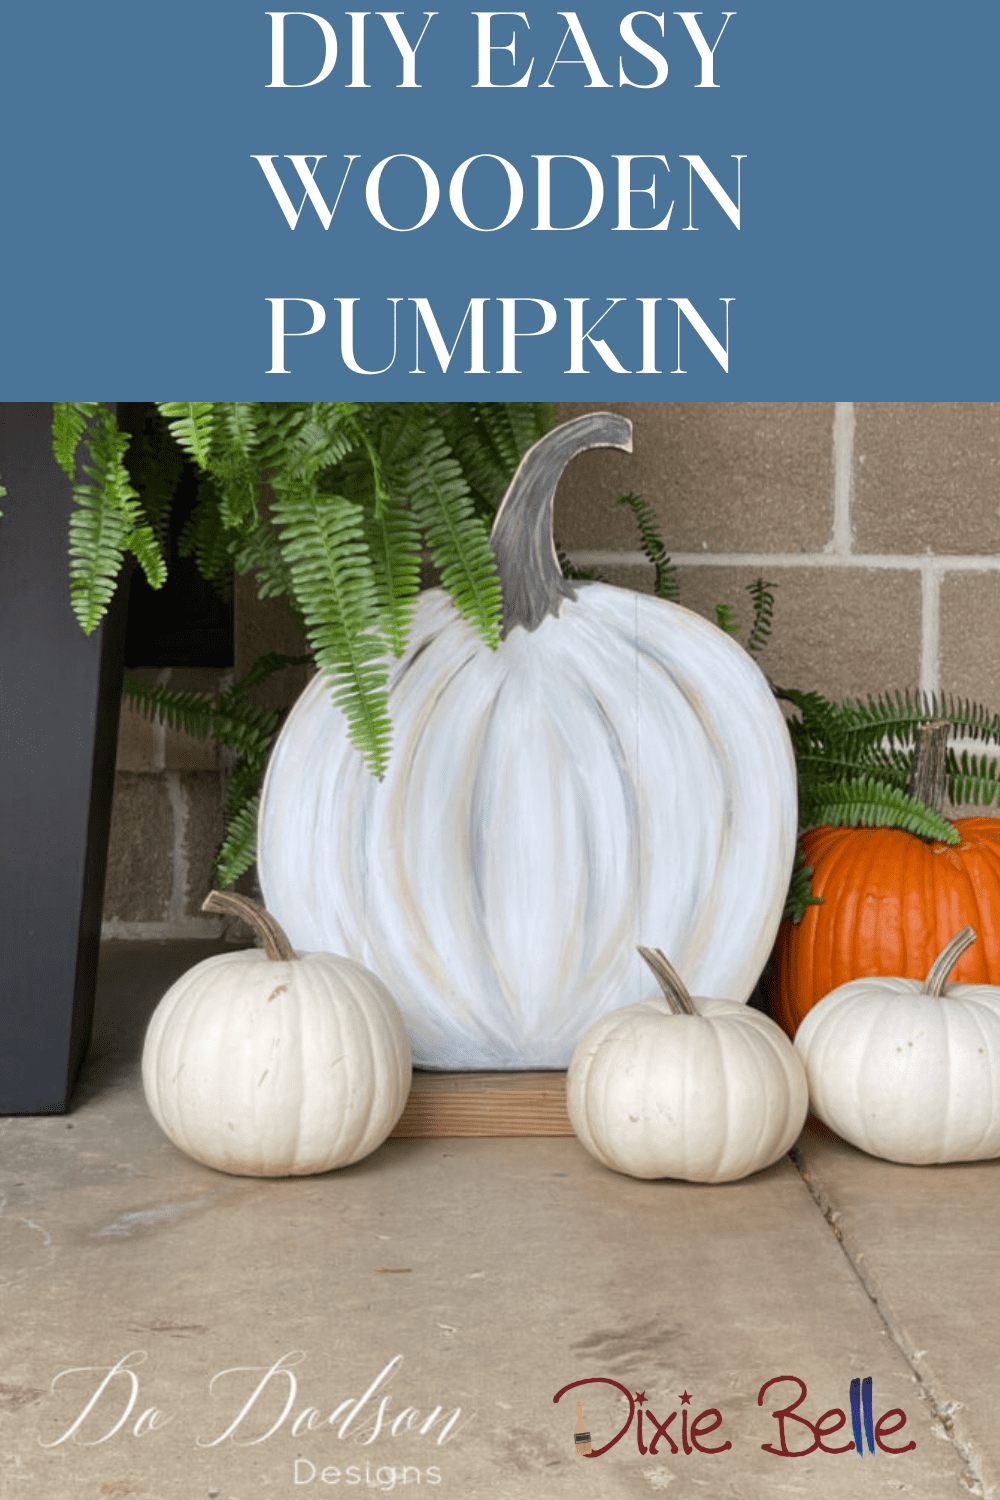
In today’s blog, we’re diving deep into the art of crafting wooden pumpkins using the delightful array of Dixie Belle Paint products. Picture this – a front porch adorned with handcrafted pumpkins, each one telling a story of creativity and a dash of autumn spirit. So grab your apple cider, pull up a rocking chair, and let’s embark on a journey of pumpkin perfection with Do Dodson.
The following is an excerpt. Please click here to read the original article.
SUPPLIES YOU’LL NEED: DIY WOODEN PUMPKINS
-
Scrap Wood
-
Saw
-
Tape Measure
-
Pencil
-
Wood Glue
-
Nails
-
Sanding Block
-
Dixie Belle Paint Synthetic Paint Brushes
-
Dixie Belle Paint Artist Brushes (for blending and shading)
-
Dixie Belle Paint BOSS (stain blocker for wood)
-
Dixie Belle Chalk Mineral Paint in Drop Cloth (Chalk Mineral Paint)
-
Dixie Belle Chalk Mineral Paint in Coffee Bean (Chalk Mineral Paint)
-
Dixie Belle Chalk Mineral Paint in Pine Cone (Chalk Mineral Paint)
STEP 1: Gather Your Supplies for your DIY Wood Pumpkins
First things first, gather all the necessary supplies for your DIY wood pumpkin project.
- Wood: Choose a sturdy and weather-resistant type of wood if your DIY pumpkin will be exposed to the weather, such as rain. If you have a covered porch or plan on using the decor inside, you can use any wood you have on hand.
- Paint: Select a variety of colors that will complement your porch decor or match the festive spirit of the season. Consider orange, white, black, or Dixie Belle’s Moonshine Metallic tones for a unique touch.
- Adhesive: Invest in a reliable adhesive that securely holds the pieces of wood together. Wood glue or a strong construction adhesive should do the trick.
- Jigsaw, Chopsaw, or handsaw: Depending on your preference and availability of tools, use any of these to cut the wood into the desired shapes and sizes for your pumpkins.
- Sandpaper: Smooth out the rough edges of the wood and create a smooth finish with sandpaper. Opt for a medium-grit sandpaper for this step.
- Paintbrushes: Have a variety of paintbrushes on hand, including large brushes for broad strokes and smaller brushes for detailed work.
- Pencil and ruler: Use a pencil and ruler to mark and measure the dimensions of the wood before cutting.
- Optional: If you want to add extra embellishments to your wood pumpkins, consider gathering additional supplies like ribbons, faux leaves, or wooden stems.
STEP 2: Measure and Cut the Wood
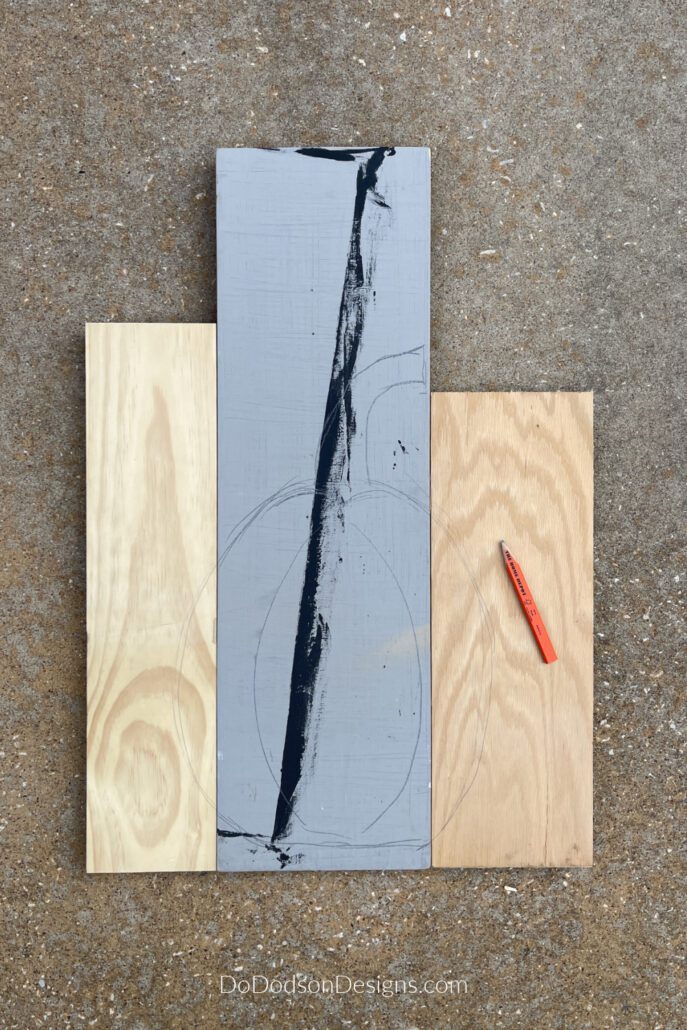
First, grab your measuring tape and pencil. It’s important to have precise measurements for a professional-looking wood pumpkin. Start by deciding how big you want your pumpkin to be. You can go for a traditional-sized pumpkin or get creative with different dimensions. I used three pieces of scrap wood. You can use random sizes. Basically, you will be laying them side by side to make one large board. It’s a great way to use up all those odd-sized scrap pieces. I placed the taller of the three in the middle. The middle board should be the tallest, as we will be cutting the pumpkin stem from that one.
Using a pencil, draw the outline of the pumpkin and the pumpkin stem on the boards. Don’t worry; pumpkins are easy to draw. If you need to, practice drawing on the back of the boards first.
STEP 3: Connect the Boards Together
Once you have decided on your DIY wood pumpkin size, flip the three pieces over and secure them together with two cross pieces of wood. Small strips of wood are perfect for this, but make sure they are big enough to be secured with screws or nails without splitting the wood. If the wood is brittle and dry, drill a small pilot hole in the wood before securing it together with screws.
Apply a good amount of wood glue to the back of each cross piece and secure with nails or wood screws. Doing this will ensure a strong connection between the three boards.
STEP 4: Cutting The Shape of the Pumpkin
Now that your boards have been secured together and the glue is dried, it’s time to cut out the shape of the pumpkin. This step will be a breeze if you have a jigsaw. Position the wood on a stable surface and carefully follow the lines you marked. Take your time and cut slowly to ensure a clean and precise cut.
Now that your DIY wood pumpkins have taken shape, it’s time to paint and decorate. Let your imagination run wild as you transform your wooden beauties into charming front porch decor that will delight you anytime you walk past them.
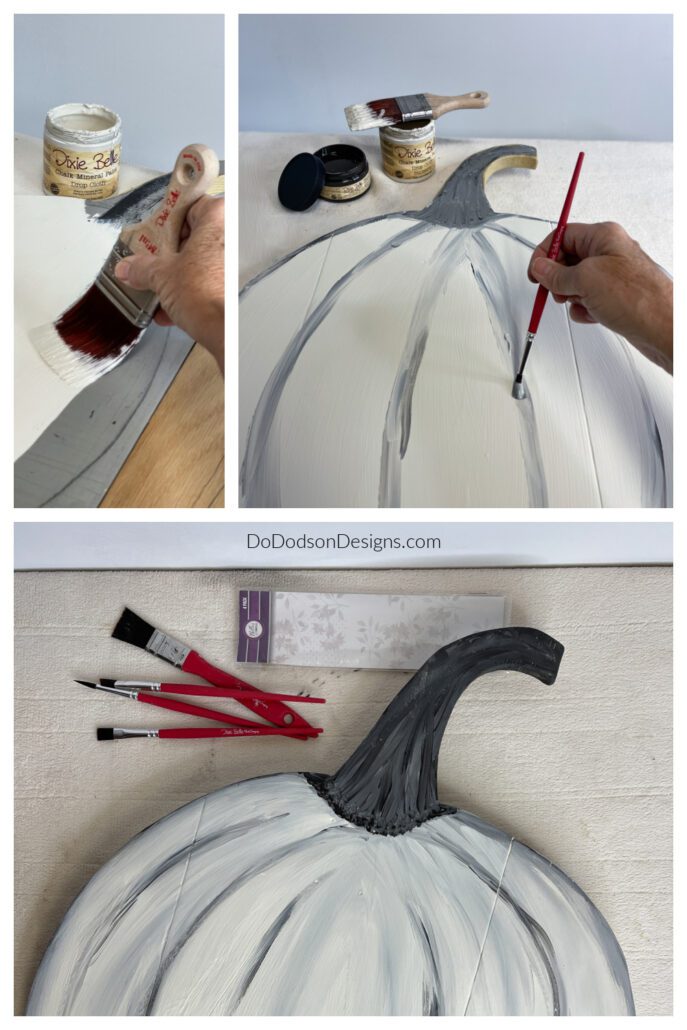
Step 5: Painting The Wood Pumpkin with Dixie Belle Paint
Before you begin painting, make sure to prepare your surface properly. Sand down any rough edges or uneven areas to create a smooth canvas for your creativity. Wipe away any dust with a clean cloth, ensuring a clean surface for optimal paint adhesion.
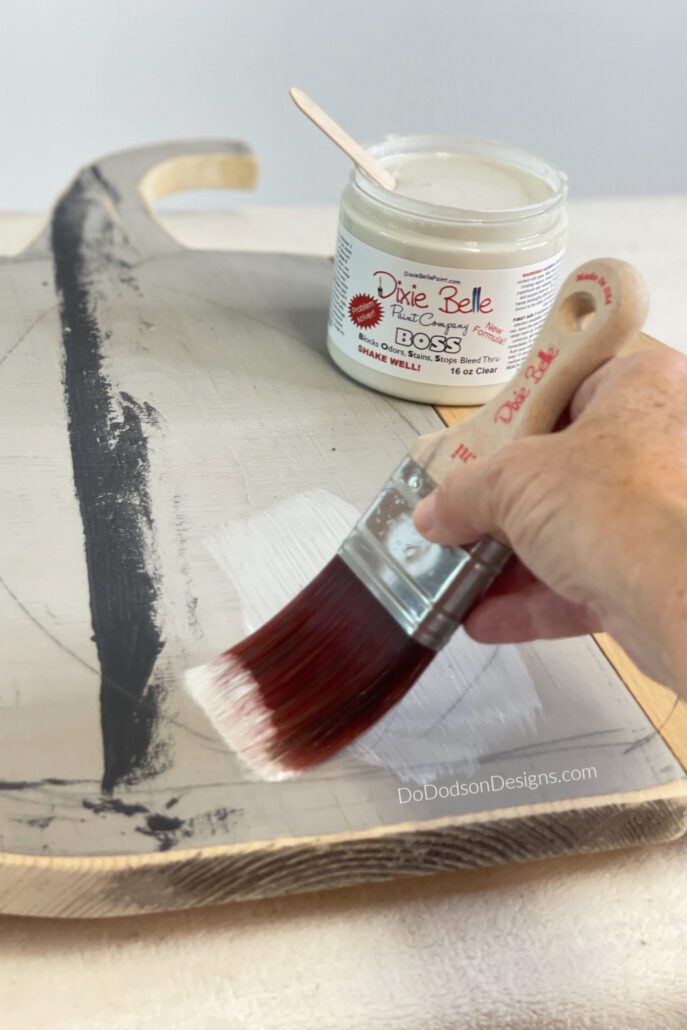
Because I’m painting over bare wood, I used a wood tannin blocker called BOSS. Apply two coats, allowing each coat to dry before applying the next. This will prevent any surfacing stains and ruining the painted pumpkin finish. If you use a darker color, you can skip this step. But I’ve never seen a black pumpkin. ? Have you? That could be fun!
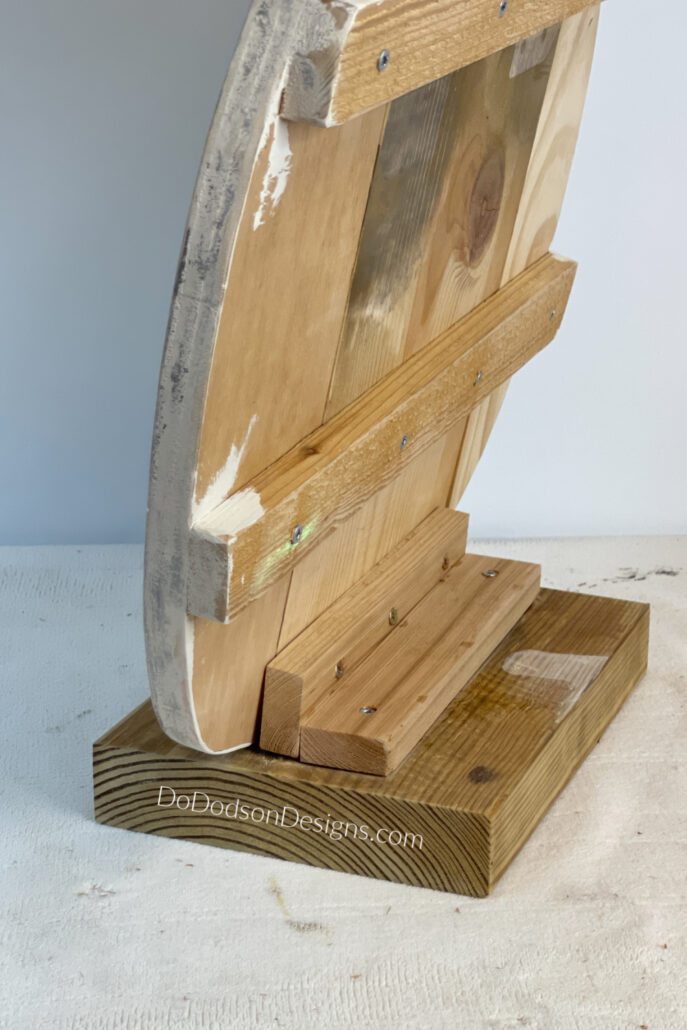
STEP 6: Making The Base For The DIY Wood Pumpkin
Here’s where all those little scrap pieces of wood come into play. The size really isn’t that important, but it depends on how large your pumpkin is. For my DIY wood pumpkin, I’m using 1X2 cedar wood. You could also use 1X4s.
I predrilled holes into the back pieces and secured the pumpkin to the base with wood glue and screws. The base is made from a 2X8. Don’t skimp on the base. You’ll need a heavier, wider board to hold the pumpkin upright and from toppling over.
Especially if you’re putting this on the front porch, you need the base to withstand the wind! The last thing you or I want is to see that beautiful painted pumpkin flipped upside down, or even worse, in the neighbor’s yard. They might keep it!
I love how easy this DIY wood pumpkin was to build, and it was budget-friendly, not to mention a charming way to convert my front porch into a cozy Fall retreat. Hey, and don’t be overly concerned that you can’t paint a pumpkin. Trust me, I’m not the best painter by far, but I have a will to create that won’t stop no matter what. Enjoy the journey. I DO! ?
Thanks for joining me today, and as always, I would love your feedback on this project. What would you do differently? How would you display it? Or just say hello in the comment section so that I know you stopped by. As the saying goes, “Crafting is not just a hobby. It’s a way of expressing oneself.” Happy crafting!
Until the next project… xo, Do
(End of Blog)
As we bid adieu to this enchanting crafting rendezvous, I want to express my deepest gratitude to the talented soul and Dixie Belle Creator, Do Dodson. Thank you, Do, for sharing your expertise and infusing this blog with your unique touch of Southern charm. Your guidance has been the compass that led us through the vast landscape of Dixie Belle Paint, turning our crafting aspirations into splendid, pumpkin-shaped realities.
To our cherished readers, don’t forget to hop over to Do Dodson’s blog for more inspiration and insights into the world of Dixie Belle Paint. Let’s join our hands in a virtual round of applause for Do Dodson, a true maestro in the art of transforming the ordinary into the extraordinary.
As your Dixie-touched pumpkins find their place in your homes, may they serve as a daily reminder of the creativity sparked by Do’s infectious passion. Until our next crafting escapade, keep painting, keep creating, and may your days be as vibrant as the hues on your pumpkins. Blessings and gratitude, y’all!


First time seeing this blog. It’s awesome! I love the useful, practical information you provide, and the DIY tutorials are wonderful! I’ll be back for more!
This is a great blog
Thank you for reading, Linda!