
Welcome, DIY enthusiasts and holiday lovers alike! We are thrilled to have the talented Do Dodson, a seasoned creator, and passionate DIYer, take the reins in today’s guest blog. As the festive season draws near, we all yearn to infuse our homes with warmth and holiday cheer. What better way to do so than by adding a touch of handcrafted magic to your decor? In this exclusive blog, Do Dodson dives into the enchanting world of wooden Christmas trees, brought to life with the exquisite products from Dixie Belle Paint Company.
Get ready to be inspired as she shares her creative process, tips, and insights on transforming simple wooden structures into stunning holiday masterpieces. With Do Dodson’s keen eye for design and the exceptional quality of Dixie Belle Paints, this blog promises to be a delightful journey into the art of festive crafting. Whether you’re a seasoned DIYer or a novice looking for inspiration, join us as we unwrap the secrets behind creating timeless, wooden Christmas trees that will undoubtedly become cherished centerpieces in your holiday home.
Let the festivities begin, and let the magic of Do Dodson and Dixie Belle Paints bring joy and creativity to your holiday season! 🌟🌲
The following is an excerpt from a blog article written by Do Dodson. For the original post, please read here.
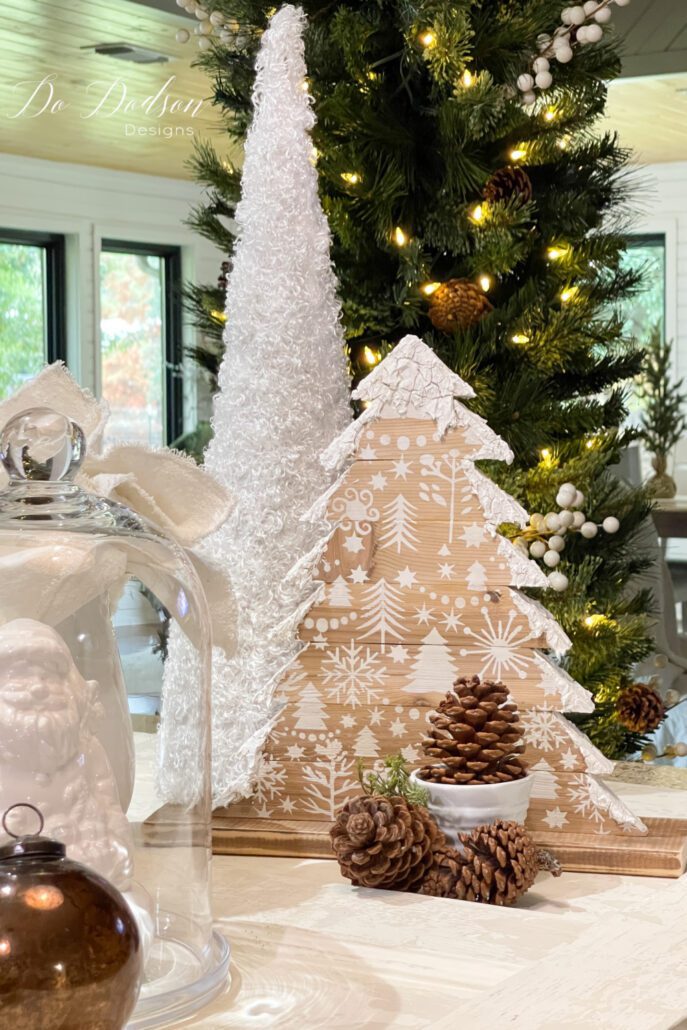
Hey, triple D friends! Look what I made! These wooden Christmas trees are easy to make and would look great in any home. This an easy, beginner-friendly DIY project for those who want to make decorations with a rustic look that not everyone else has. Plus, you can make this project with the scraps of wood you already have on hand.
This holiday season, I decided to try my hand at this easy project I saw on Pinterest. This DIY is beginner-friendly and doesn’t require a tree pattern. You use whatever boards you have on hand. Because I have lots of scraps, I used some 1×2 strips I had left over from a previous project. This will make a small tree. But you can make larger trees using a 2×6 board, which would be the perfect size for free-standing wood trees for the front porch. The size of the wood you choose determines the size of the wooden trees you make. If you can cut a 45-degree angle, you can make this project.
Supplies List:
-
Scrap wood lumber or wood pallets (if using Wood Christmas Trees outdoors, use treated lumber)
-
Miter Saw or Circular Saw
-
Sandpaper or Sander
-
Wood glue
-
Nails and Hammer
-
Cotton Chalk Mineral Paint by Dixie Belle Paint Company
-
Christmas Cheer Stencil by Dixie Belle Paint Company
-
Painters tape
-
Sea Spray texture additive by Dixie Belle Paint Company
-
Craft stick
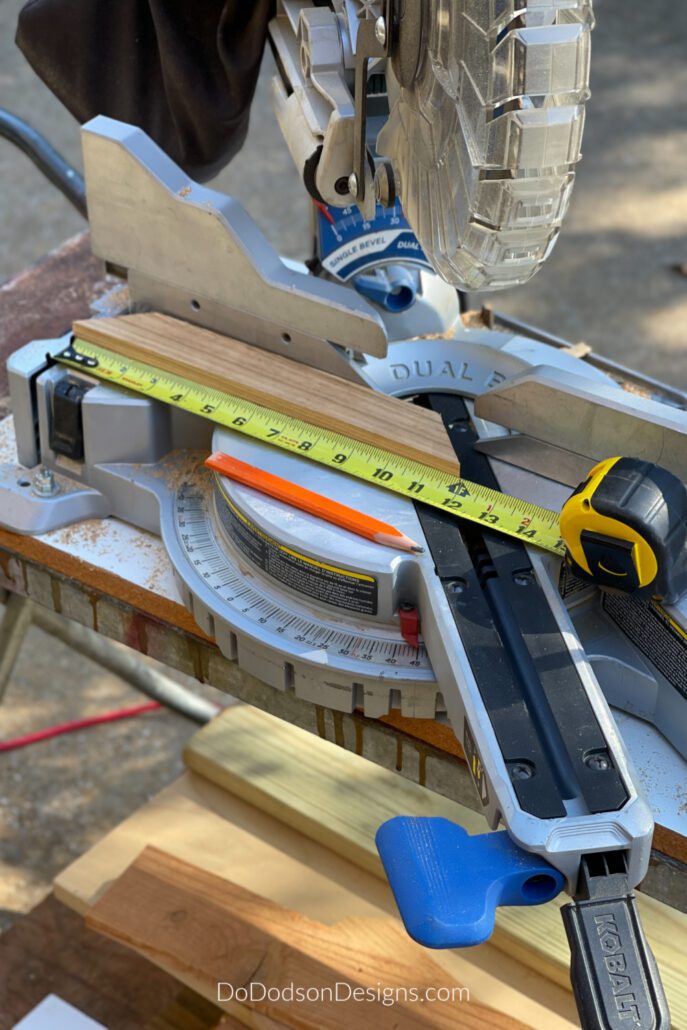
STEP 1: Cutting The Wood
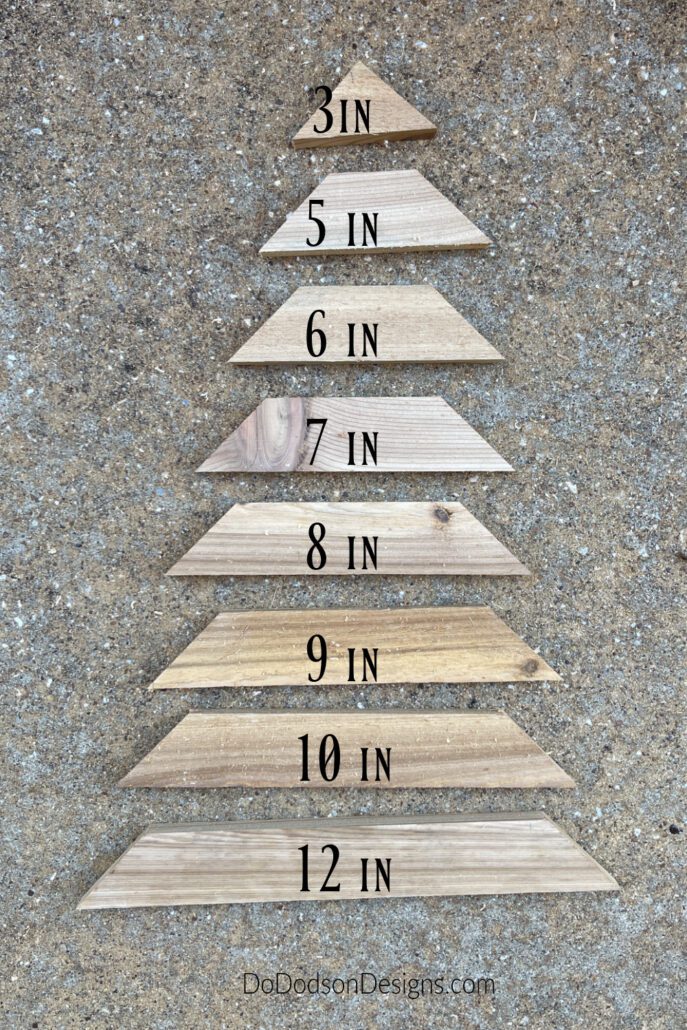
There are precisely 9 pieces, including the base, for this wood Christmas tree project. Here are the measurements for my wooden Christmas tree, starting with the first bottom board (the longest) of the tree and going up. Each board was cut at a 45-degree angle at the long point, measuring 12, 10, 9, 8, 7, 6, 5, and ending with 3 inches (triangle) that made the top point of the tree.
Be sure to carefully measure and mark each board with a pencil mark before cutting. Remember, the mark will be the long point on each board.
STEP 2: Cut The Base For The Wooden Tree
For the base (bottom piece) of the DIY Christmas tree, I used a 1×4 and cut it 2 inches longer (14 inches) than the bottom of the longest board of the wood Christmas tree. The base will need to be a bit larger and longer to give your wood Christmas decor the stability it needs to stand alone, much like a shelf sitter without the tree trunk.
STEP 3: Lightly Sand The Wood
Once the boards are cut, giving them a light sanding with a 220 abrasive is best. I do this to knock off the rough edges caused by the saw and to give it a more finished look.
STEP 4: Assemble The Wooden Christmas Tree
Lay all your boards on a flat surface. Do a dry run and assemble the wooden Christmas tree to ensure all your cuts and angles are correct before gluing. If it looks good, It’s time to glue. Using wood glue, start with the bottom piece of the wooden Christmas tree and add a small amount to the connecting pieces. Glue the wood pieces of the tree together on a flat surface, pushing the top piece against a solid structure and securing it with something heavy so that it doesn’t move. Wood glue dries super strong, and it will work fine for decor.
STEP 5: Stencil, Paint and Decorate
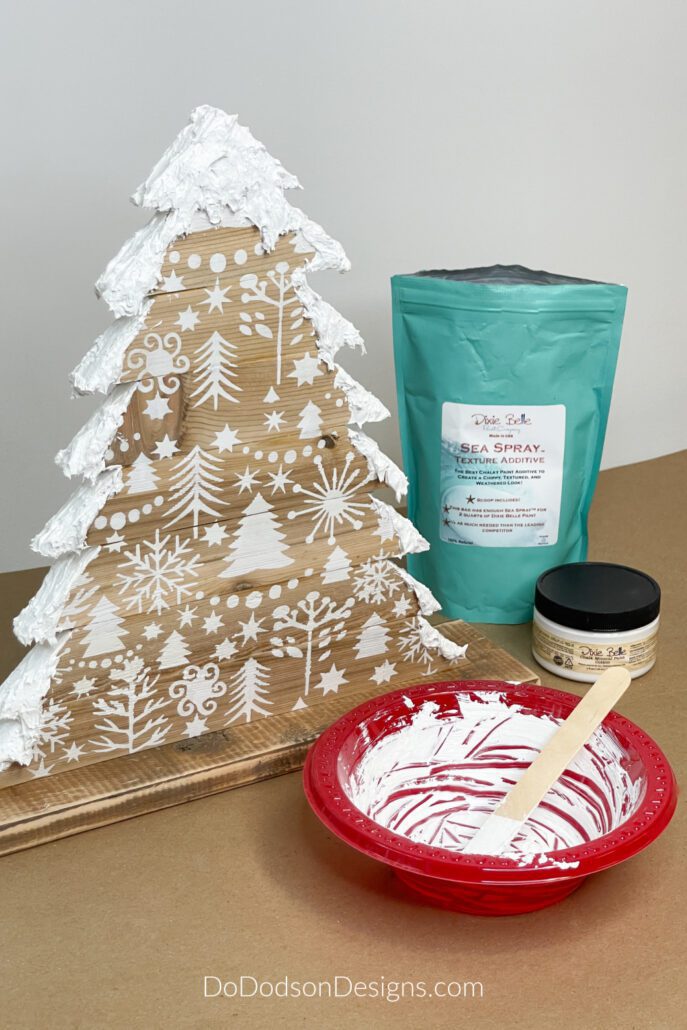
Now that you have your wooden Christmas tree assembled, you can leave it as is or decorate it to suit your style. Choose your favorite festive paint color, or you could even stain the wood for a farmhouse-style finish. But for mine? I used the Christmas Cheer stencil by Dixie Belle Paint Company and the icing on the cake (so to speak) is this beautiful, white, fluffy texture (Sea Spray Paint Additive) I used to create a wintery snow-kissed topping. Here’s how I did it.
Before you begin your stencil project, remove any sawdust that may be left over from sanding. Secure your stencil across the wooden Christmas tree using painter’s tape.
Using the paint of your choice (I used Chalk Mineral Paint), dab a small amount on a sponge or stencil brush and gently dab the paint over the stencil. Be sure to use a minimal amount of paint because using too much paint can cause the paint to bleed under the stencil, especially if you’re using a wood surface that doesn’t have a super smooth finish. Less is more, and you can always apply more as needed.
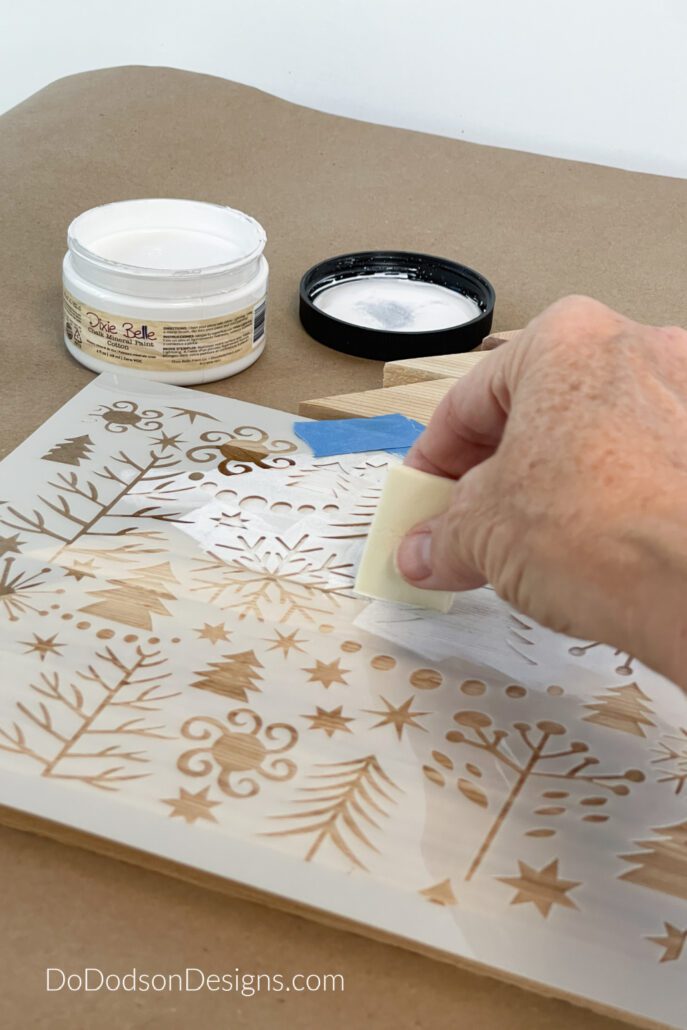
If you have an oops, wait until the paint is dried, gently sand away the paint on the wood, and try again. Wash your stencil immediately after use with warm, soapy water. Rinse with clear water and pat dry on a soft towel to reuse for future projects.
After the stenciled design is dry, attach the base with wood glue and use nails for additional strength. Nail through the bottom up into the base of the tree. You can also use screws. If you don’t have nails or screws, no worries. I have many DIY wood projects in my home held together with only wood glue.
STEP 6: Texture Sea Paint Spray
Mix a small amount of Sea Spray Texture powder additive in chalk mineral paint. Mix well with a craft stick. Add more paint or texture powder until you get a smooth peanut butter consistency. I rarely measure. Sorry. I tend to follow this method in my kitchen as well. It’s how Grandma would do it. Apply this mixture with the craft stick to wherever you want it to look, like snow has kissed your tree. Allow the texture paint to dry overnight.
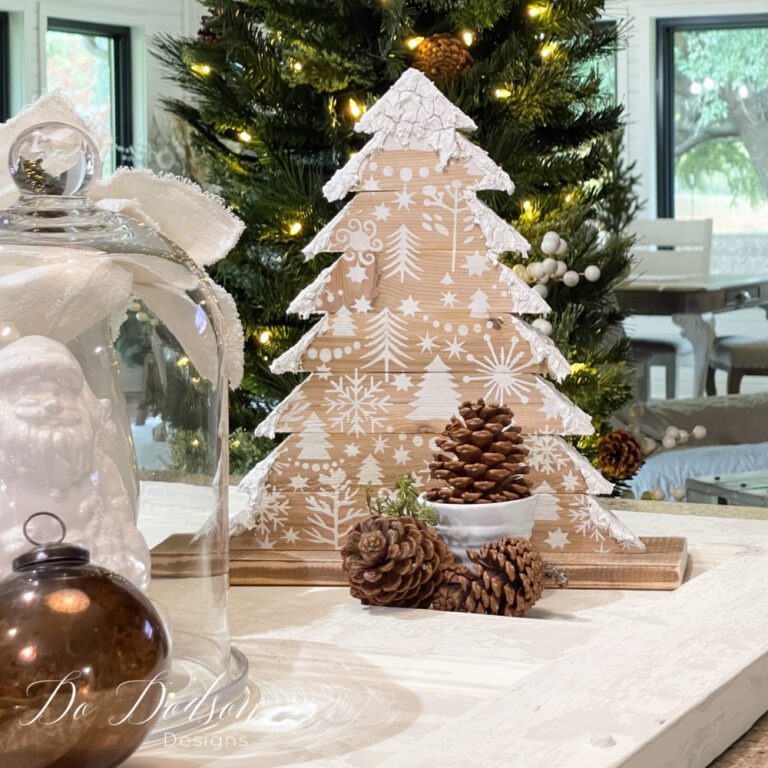
With all its rustic charm, this wood Christmas tree is undoubtedly a show-stopper. I can’t quite decide exactly where I will use it in my home for this Christmas. I’m what they call a slow decorator. I enjoy moving it around in different places to see where my masterpiece fits best with my other holiday decor. Take your time and have fun decorating. I hope you’ve enjoyed learning how to create your very own wooden Christmas trees to add to your favorite Christmas decor.
Merry Christmas and Happy Holidays, y’all!
Until the next project… xo, Do
And there you have it –
A magical journey through the artistry of wooden Christmas trees with the incredible Do Dodson and the outstanding products from Dixie Belle Paint Company! We hope you’ve been inspired to infuse your holiday season with a touch of handmade elegance. As we wrap up this enchanting guest blog, a huge thank you to Do Dodson for sharing her creativity and expertise. Remember, the joy of crafting is not just in the final result but in the process itself. So, gather your Dixie Belle Paints, embrace the festive spirit, and embark on your own holiday crafting adventure.
We invite you to explore more wonderful creations crafted with Dixie Belle Paint Products and discover the endless possibilities on our blog. Keep the DIY spirit alive and make this holiday season truly special with unique, handcrafted treasures that reflect your style and personality.
Wishing you a season filled with warmth, love, and the joy of creating beautiful memories. Happy holidays, and may your home be adorned with the magic of Dixie Belle-painted wonders!


