Welcome! Denise from Salvaged Inspirations is here with a stunning dresser makeover using Dixie Belle’s Dried Sage Chalk Mineral Paint. Check out her tips and see how this calming green brings new life to furniture!
(The following is an excerpt from Salvaged Inspirations. Read the full article here.)

Here’s the three-drawer dresser.

The drawer and body are in good shape.
But I’m not a fan of the dated drawer carvings. Even if they were painted out, I feel their shape and the chipped and uneven wood within the groove would still make this piece look a little dated. Rather than try to smooth everything out, let’s create a modern smooth paint finish.

WHAT YOU’LL NEED
3 Drawer Dresser – SALVAGED
Sand Pads | Shop Towels
Easy To Sand Wood Filler (Dixie Belle Mud)
Bondo Filler
Bosch Sander
White Lightning Cleaner
Paint Brushes
Smooth Roller
Dried Sage Chalk Mineral Paint
Gator Hide Topcoat
Brushed Brass Hardware Pulls
PAINTED THREE DRAWER DRESSER
This dresser is a super cute three-drawer laminate dresser from the 50’s. I’ve worked on pieces with similar finishes here, here and here. These dressers can be salvaged and transformed into modern beauties if the dated detail is filled in. And that’s exactly what I’m going to share today. It’s easy to do and like I always say, if I can do it, YOU can do it. I’m sharing my favorite way to fill in dated drawer details seamlessly… you won’t even know they were there! These simple steps can transform a dated piece into something spectacular that sells at retail stores for hundreds of dollars. So salvaging these pieces is SO WORTH IT! Here’s how it all came together…
CLEAN/PREP
The inside and outside of this dresser were cleaned well with this White Lightning. I wiped it down a few times and then used clean water to remove any residue.

HOW TO FILL OLD DRAWER DETAILS
An easy way to update an older dresser is by filling in the dated engraved details on the drawers. I use Bondo to fill these grooves because they are often fairly deep and wide. A regular wood filler would work but requires several applications to get a smooth finish – and who has time to wait for all the dry time? Bondo is perfect for larger repairs and dries quickly.

My secret to getting a seamless finish is applying a ‘soft’ easy-to-sand wood filler OVER the Bondo. This fills in any tiny air bubbles, and little misses the Bondo did not perfectly fill in. I do this right after the Bondo dries, however, you could sand the Bondo down flush and then apply the wood filler if you felt more comfortable. This way it saves you money and product because your applying it ONLY where it needs to be rather than along the full design.

SANDING
The next morning I scuff-sanded the body and drawers smooth using 100-grit sandpaper and my Bosch Sander. This gave the surface a little tooth for good paint adhesion. Then using a tack-cloth, I removed all the sanding dust before priming.

PRIMING
Primer was needed to block the wood filler and Bondo showing through the paint – otherwise, the paint would ‘take’ differently and you’d be able to see where it was filled in because the paint would look slightly darker.
Bonding BOSS is a water-based version of a bonding stain-blocking primer. It works equally well but requires a 24 hours dry time to do its thing.

PAINTING
I used one of my favorite colors – Dried Sage Chalk Mineral Paint. I’d describe it as a neutral beige-green – muted so it has a serene feel. To get the smoothest finish without using a sprayer, I brushed on a coat of paint and immediately once the paint was laid down, I lightly went over it with a roller


FINISHING DETAILS
For the finishing details, I sprayed three coats of Gator Hide topcoat letting each coat dry for two hours in between each coat. I find Gator Hide sprays beautifully. Depending on how thick you spray or brush it on will depend how fast it dries, but I would say it’s a fast dry time in comparison to some other topcoats. The added bonus is it provides a SUPER strong finish!
Tip – When painting and topcoating legs, I find it helpful to take a scrap piece of wood and drill four holes to make a ‘stand’ for them. This way the paint and finish stay meticulous because they are not falling over or touching anything.

The last detail was adding these gorgeous brush brass edge hardware pulls and reattaching the legs.

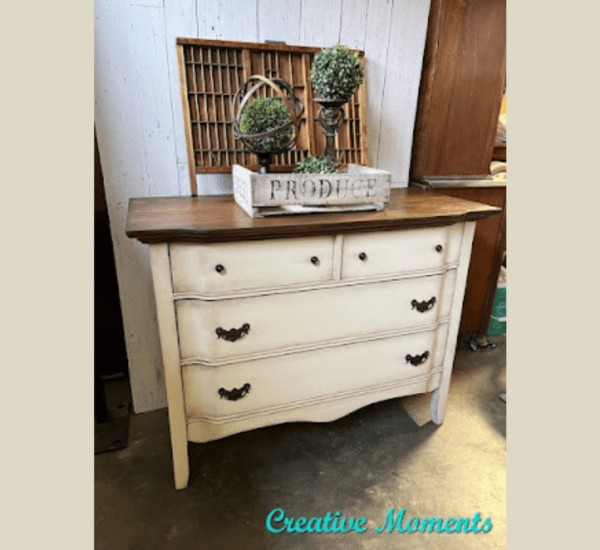
THE FINISHED LOOK
Here’s the finished look. I LOVE it!

Thanks for joining us! We hope Denise’s makeover inspired your next project. For more ideas and tips from Salvaged Inspirations, check out our blog Thrifted Tallboy Dresser. Happy painting!