Are you ready to see a classic cedar chest transformed into a standout piece? Denise from Salvaged Inspirations took on this makeover using Dixie Belle Silk All-In-One Mineral Paint, adding beautiful trim and even creating a custom color that brings out the unique character of this chest. With her creative eye and expert techniques, Denise has brought a fresh look to a timeless piece.
(The following is an excerpt from Salvaged Inspirations. Read the full article here.)

This cedar chest makeover is a PERFECT example of how a little trim can totally change the look of a plain piece of furniture. If you’ve never added trim to your pieces, I hope this salvaged chest makeover inspires you to give it a try!

Here’s the cedar chest I started with. It’s a good solid piece and the inside is meticulous!
The outside needed a little love though. The veneer was chipped and scratched.

And there was a big stain that had penetrated the veneer on the top.

WHAT YOU’LL NEED
- Solid Cedar Chest – SALVAGED
- White Lightning Cleaner
- Sand Pads | Shop Towels
- Easy to Sand Wood Filler
- Bonding Boss Primer
- Bosch Sander
- Paint Brushes
- Art Brushes
- Yellowstone Silk All-In-One Paint
- Prickly Pear Silk All-In-One Paint
- Measuring Tape | Pencil
- Ryobi Miter Saw
- Wood Trim (Home Depot)
- Titebond Wood Glue
- Pneumatic Brad Nailer
- Gold Gilding Wax
CLEAN AND SCUFF
This white lightning cleaned this cedar chest on the inside and out. I wiped it down a few times and then used clean water to remove any residue. Then the outside of the chest was given a quick scuff sanding.

HOW TO ADD TRIM
After I figured out my spacing it was time to add the trim to my furniture.
Here’s the step-by-step to add trim to furniture ~
- Measured furniture
- Measure and cut trim to size
- Calculate the spacing between your trim design (as above)
- Measure out your spacing and mark where your trim will be added
- Adhere the trim with wood glue
- Secure with a brad nailer/trim gun
- Remove excess glue
- Prime and paint or stain

PRIME
Once all the trim was added on, I primed with this Bonding Boss Primer. It was my first time using this 2″ synthetic chip brush and I loved it. It works even better than the regular chip brushes for brushing on this primer and it’s super cheap!
WOOD FILL IMPERFECTIONS
When the first coat of primer was dry, it was easy to see where ALL the imperfections like the chipped veneer, scratches, trim nail holes etc required filling in with wood filler. I used Dixie Belle White Mud because it’s so easy to hand sand.

CUSTOM PAINT COLOR
With fall just around the corner, I’m thinking of changing leave colors, cooler temps, and pumpkin lattes, which are just a few of my favorite things! I created a custom FALL paint color using the Dixie Belle Color Lab. I wanted to create a caramel-eee / pumpkin spice-eee yummy color for the upcoming season. Ultimately, I used the top formula and added approximately 80% Yellowstone to 20% Prickly Pear.
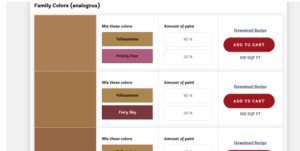
When I painted on my first coat, it looked nothing like my screenshot. My paint studio is filled with heavy duty lighting so I can see everything I’m spraying and painting along with taking videos and images that YOU can see. I often have to remember this when using new-to-me colors. They often don’t look anything like what they will look like in natural lighting.

The second coat started to look a little more true to what I was after. The third coat was a charm when I brought it upstairs!

FINISHING DETAILS
For the finishing details, I removed the painters’ tape from the hinges and legs. I used Gold Gilding Wax to make the bottom part of the brass legs look new again. I also painted and touched up the inside rim of the chest. No topcoat was required because it’s included with the SILK All-In-One Mineral Paint!

THE FINISHED LOOK
Here’s the cedar chests’ finished look. Oooooh-la-la!

The custom paint color looks MUCH different than it did while I was painting it under all that fluorescent and camera lighting. After it was all dry and I brought it upstairs into natural light and I like it so much better!!
And here’s a close-up look at the trim with the chest opened up.

A big thank you to Denise from Salvaged Inspirations for sharing her cedar chest makeover with us! Her addition of trim and custom Silk All-In-One Mineral Paint color shows just how versatile our products can be. We hope you’re inspired to try something similar on your next project! For another Silk All-In-One Mineral Paint project completed by Salvaged Inspirations, check out our blog, Yellowstone Silk Painted Side Tables.


