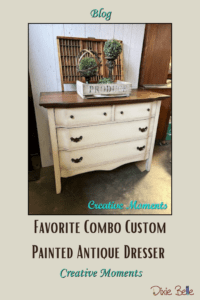
Welcome to today’s guest post featuring the creative LeeAnn from Creative Moments! LeeAnn has a special way of breathing new life into vintage pieces, and this antique dresser was no exception. Using Dixie Belle Paint products, she gave it a beautiful warm white finish that pairs perfectly with a deeper stained top. If you’ve been looking for a project to spruce up a favorite old dresser, get ready to see how LeeAnn’s step-by-step process can help you achieve a fresh, stylish look for your own furniture.

(The following is an excerpt from Creative Moments. Read the full article here.)
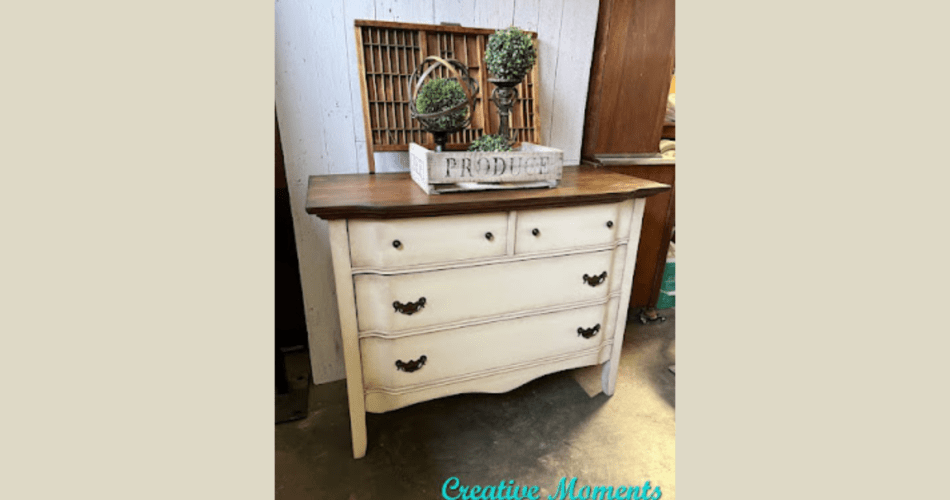
A valued customer entrusted me with restoring an antique dresser she found online. It was in a much rougher shape than advertised when she picked it up, but I believe I transformed it to match her vision. With its classic warm white finish and a darker stained top, it now has the timeless charm she envisioned.

Supplies:
- Pristine Clean
- Drop Cloth Chalk Mineral Paint
- Golden Ash No Pain Gel Stain
- Walnut No Pain Gel Stain
- Easy Peasy Spray Wax
- Brown Best Dang Wax
- Big Mama’s Butta
- French Tip Brush
- La Petite Brush
Clean and prep work:

To get started, the first step is a very deep and well-needed clean. I mixed this cleaner in a bucket of warm water.


Using a scrub brush, every surface inside and out was scrubbed until clean and then rinsed thoroughly. Look at how dirty the water is coming off in the left photo.

The dresser was in rough shape, causing many repairs to be done before painting. Check out the repair and sanding progress so far. It has come a long way, but all these steps are super important to complete before the next painting steps.
Apply paint and stain:

After all repairs were completed and the dresser was cleaned, Drop Cloth Dixie Belle Chalk Mineral Paint, a favorite warm white was brushed on the drawer fronts. Perfect.

Next, the top was stained. The client specifically requested a medium stain for this piece.

To be sure the bare wood did not absorb the Walnut too dark, I first applied a coat of Golden Ash No Pain Gel Stain. It looks darker above on the half it went on.

Next, while the golden ash was still wet, I applied a coat of Walnut No Pain Gel Stain over top and wiped it back as well.

After the top had another coat of Walnut No Pain Gel Stain applied, it was left to dry 72 hours minimum before sealing.


The warm white Drop Cloth Chalk Mineral Paint was now brushed on the base. 2 coats of Drop Cloth Chalk Mineral Paint were applied. After each coat, the paint was sanded, which distressed the edges.
Add an additional layer of protection:

To add a bit more protection and seal the Chalk Mineral Paint, I used Easy Peasy Spray Wax.

The clear spray wax also makes the next step easier. This step is to make the piece look old again. However, the details give it a worn appearance. Thus, it keeps its vintage charm.
Brown Best Dang Wax was brushed in the nooks and crannies and edges with a French Tip brush. It was then wiped back to create an aged look.


The dresser edges were worked on next. You can see above how it makes the warm white paint look like it has been on the piece for years.
Rejuvenate drawers:

These old dressers have very dry wood, so to rehydrate the wood and allow the drawers to slide easily, I applied Big Mama’s Butta with a dedicated La Petite brush. The excess was then wiped with a lint-free blue shop towel. The inside rails were done, as well as inside the drawers themselves.
This Big Mama’s Butta comes in different scents, which helps with stuffy antique smells too.
Replace hardware:

Finally, the last step is hardware. Consequently, I found four knobs in my stash that match the existing pulls. However, I’m not sure they were original. Regardless, they can be changed easily in the future. For now, the dresser has functioning hardware.


And there you have it—a wonderful way to give your furniture a clean, warm white appearance with a rich, contrasting top. We hope LeeAnn’s process sparks plenty of ideas for your next DIY adventure. For more tutorials, tips, and inspiration, be sure to check out LeeAnn at Creative Moments. Thanks for joining us on this makeover journey—now it’s time to pick up your paintbrush and dive into your own furniture refresh! For another neutral makeover by Creative Moments, check out our blog, Bedroom Set Makeover with Silk All-In-One Mineral Paint.