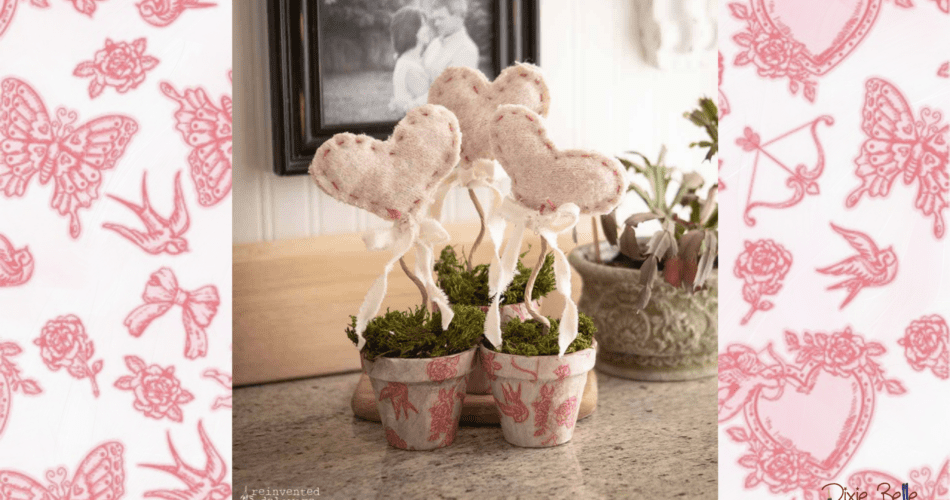
Valentine’s Day is the perfect time to get creative with upcycled decor! Cindy from Reinvented Delaware is sharing a charming way to turn a thrifted sweater into heart-shaped “flowers” displayed in decoupaged terra cotta pots. With Dixie Belle Paint products, this DIY adds a cozy, handmade touch to your space. Let’s get started!
(The following is an excerpt from Reinvented Delaware. Read the full article here.)

Why Diy Decor For Valentine’s Day?
Many of us do not go all out with diy Valentines Day decor. But many of us like to add small touches to celebrate love in our homes! We can all agree that we want easy and inexpensive home decor for this holiday!
We want to add a decorative touch but we don’t want to spend a ton of money!
If that’s you, then you will enjoy this tutorial. You will find an easy project to make that has many ways to decorate in your home or give as a diy Valentine’s gift!
You could even get the kids involved in making one of these diy potted heart flowers for their teacher! Grab extra supplies so you can make some for your girlfriends for a Galentine’s Day gift! Whoever is the recipient of this adorable diy valentine will enjoy the gift! Let’s get started!
DIY Valentine’s Day flower pots
I’ve been gathering small terra cotta pots to decorate my garden she shed. You can find them at thrift stores, auctions, yard sales, and salvage yards. If you can’t find used terra cotta pots, you can also purchase them at a reasonable price on Amazon.
My terra cotta pots were slightly dusty so I gave them a good washing with soap and water first. I allowed them to dry completely.
Supplies
- 3″- 4″ terra cotta pots
- Conch Silk All-In-One Mineral Paint
- Vintage Hearts decoupage paper
- Brown Best Dang Wax
- Mod Podge
- paper covered wire
- floral moss
- floral foam

Step One: Paint the terra cotta pots
Since I will be applying decoupage paper to these terra cotta pots, I chose to paint them first. Decoupage paper can be thin and I didn’t want the orange tone of the terra cotta to show through.
It only took one coat of this pretty pink color, Conch Silk All-In-One Mineral Paint. The pots could also be painted white. If you choose a light color you may have to paint more than one coat. Allow the paint to dry thoroughly before applying the decoupage paper!

Step Two: Create stuffed hearts
Now let’s make a bouquet of hearts! I purchased a pink sweater from the thrift store to make my hearts. The sweater has a bit of glitter in the weave and the color is a muted pink. You can choose whatever shade of pink or red that you like!
- Cut the heart shapes
- Stitch the stuffed hearts


Step Three: Apply decoupage paper
Dixie Belle has this adorable decoupage paper filled with butterflies, roses, bows, and of course, Cupid’s famous arrow, the Vintage Hearts decoupage paper. It’s perfect for this Valentine’s day project!
Applying decoupage paper is so easy! First, let’s cut a pattern to form around the shape of the terra cotta pots.
Using a scrap of computer paper and pencil, I marked around the paper as I rolled the terra cotta pot on the paper. Next, I cut out the pattern with a bit of excess at the top and bottom and used it to cut out the decoupage paper.
This gave me the shape to conform to the angle of the flower pots and will be the perfect fit. I applied a thin coat of Mod Podge on the terra cotta pots in sections, laid the decoupage paper on that area and smoothed it out. I continued around the pot working in small sections at a time.


This gave me the shape to conform to the angle of the flower pots and would be the perfect fit. I applied a thin coat of Mod Podge on the terra cotta pots in sections, laid the decoupage paper on that area, and smoothed it out. I continued around the pot working in small sections at a time. Dixie Belle Clear Coat Satin also works very well for decoupage adhesion.
When I got all the way around the pot, I tore the edge of the decoupage paper so that it would blend in. A hard-cut edge would be noticeable.
Once all of the decoupage paper was adhered to the pots, I applied a thin coat of Mod Podge to seal it and I allowed it to dry completely.
The next day, I used the edge of an emery board to file off the excess paper along the top and bottom edges. Then I applied one coat of dark furniture wax to age the paper and give it a vintage feel.


Step Four: Assemble the heart flower pots
Now that all the components are ready, let’s put these heart flower pots together! Place a small piece of floral foam in the terra cotta pot. You want to cut the foam a bit large so that it fits tightly in the pots. You can also add a dab of hot glue to hold the foam in the pot.
Stick the paper-covered wire into the foam. Use floral moss to cover the foam and to create a pretty base for the heart flowers.
If you do not have the paper-covered wire, you could use pretty paper straws or soft green pipe cleaners as the stems.
I tied a piece of diy fabric ribbon around the top of the wire for an added touch of whimsy. You could use any ribbon, twine, or other fabric to create a similar look.

More Valentine’s Day DIY ideas
If you do not want to cut the hearts from a thrifted sweater, then I have another idea for you! In my freebie library, I have created adorable watercolor-painted hearts that could replace the sweater hearts!
Print the design on heavy card stock or better yet, on watercolor paper. Cut the hearts out using sharp scissors leaving a narrow white border around the edges of the heart.
Then simply use hot glue to attach the paper-covered wire to the back of the hearts. You can print double the amount of hearts you want so that the heart-shaped flowers will be two-sided. The choice is yours and the hearts are free!

With a little creativity, everyday items can become something special! Dixie Belle Paint makes it easy to add a handmade touch to your Valentine’s decor. Ready to start crafting? Explore Dixie Belle’s paints and decoupage designs for your next DIY! For another simple decoupage project, check out our blog, Decoupage Paper Repurposed Gift Basket.


