Welcome to our blog! Today, we’re excited to feature Linda from Q is for Quandie, who will show us how she did a rusty pot refresh using Dixie Belle Patina Paint. Linda’s creative expertise and step-by-step guide will help you transform those old planters into stunning garden pieces. Let’s dive in and get inspired! 

Dixie Belle Supplies: 

 (The following is an excerpt from Q is for Quandie. Read the full article here.) 

History: 

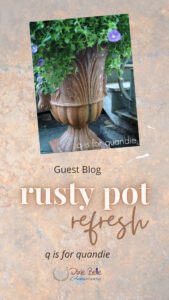
Back in 2019 I picked up a pair of garden planters made out of some sort of molded composite material. 

Two brown ornamental planters siting on the ground, with dirt and leaves on the ground. A blue house is in the background, along with a tree trunk and greenery.

I turned them into faux ‘rusty iron’ planters using Dixie Belle’s Patina Paint. 

A brown rusty ornamental pot sitting on a black surface with green plants and purple flowers hanging out of the top, q is for quandie is printed in white in the lower right corner. Steps are to the right of the pot.

Iron paint and green spray were used to create a rusty look (you can find the details for that project here). 

3 jars of Patina Paint, two bottles of Patina Spray and a gray spray nozzle sit on a tan tabletop with a white curtain in the background. The paint jars have white labels, one says Dixie Belle Patina Paint Bronze, one says Dixie Belle Prime Start, one says Dixie Belle Patina Paint Iron, they are stacked in a pyramid with the Bronze jar sitting on top of the Prime Start and the Iron Paint. To the right of the paint are the Patina Spray bottles, the blue spray is in the back and the Patina Spray Green is in front. The gray spray nozzle sits in front of everything.

A protective top coat was not added to them.  Dixie Belle does make a top coat called Patina Guard for the Patina Paint, but it adds a little too much sheen for my taste (you can read about that here). 

Even without the Patina Guard, my pots have held up remarkably well considering that they have spent 5 years outside, rain or shine (or snow), hot or cold. 

The corner of a brown house with a white door and roof sitting on a snowy porch with 2 steps. Two brown pots with snow covered plants sit on either side of the door. A large snowy tree is in the background, with a brown fence. 3 white candle holders with white candles line the steps.

But sitting in wet snow or on damp pavement for long periods has taken a toll on the bases. 

A brown metal pot sitting upside down on a wooden board. The board is sitting on a cement ground, painted brown, green and white.

The upper parts of the pots still look good though. 

A brown rusty ornamental pot sitting on a cement floor with a tree and fence in the background.

So I thought I’d take advantage of some gorgeous, sunny weather we had back in early April and just touch up the bases. 

Step 1:

I started by brushing away any dirt, and then I used a scraper to remove the loose paint from the base. 

A brown pot sitting on top of a cement platform, the platform has brown paint chipping off of it. In front of the platform is a silver and black Anvil paint scraper and several brown paint scrapings, preparing the piece for the rusty pot refresh. All are sitting on a cement floor that has brown, green and white paint on it.

You’ll note that the paint peeled right down to the original substrate.  When I purchased these pots they’d already been painted a dark brown.  I have no idea what kind of paint was used, but that original layer of paint is what failed here. 

Step 2:

The next step was to add a base coat of Dixie Belle’s Midnight Sky. 

A brown ornamental pot sitting on top of a platform. Both the platform and the bottom of the pot have wet black paint on them. In front of the pot is a clear cup with a dark liquid in it, a paint brush with black paint sits across the top of the cup and a brown stick is propped up in the cup All are sitting on a piece of cement that has brown, white and green paint on it.

Dixie Belle does make a primer that is specifically for use under the Patina Paint… 

A jar of orange paint sits on a cement floor, the paint has a white label on it that reads Dixie Belle Paint Company, Made in the USA Prime Start. A brush with orange paint is propped up against the paint jar. The background has an orange piece of furniture and a white stool. Q is for quandie is printed in black in the lower left corner.

You also can just use any of their chalk mineral paints for the same purpose. If you are applying Patina paint to metal, however, you should apply Prime Start first.

Step 3:

Once the black paint on the base of my pot was dry, I stippled on the Iron paint. Then the green activator spray was applied, while the paint was still wet. 

A brown and gray ornamental pot sits on a gray table top, showcasing the start of the patina effect in the rusty pot refresh, in the background is grass and leaves and trees.

Out of the three patina paints that are offered (Bronze, Copper and Iron), I find that the rusty patina with the Iron paint takes the longest to develop.  Luckily I had some time between when I refreshed these back in early April and the actual arrival of gardening season here in Minnesota.  Initially, these pots looked a bit two-toned (as you can see above), but the rust continues to develop over time.  So don’t panic if you try this and immediately think it didn’t work at all. 

4 wooden blocks sitting on a blue table, the blocks have letters on them that spell out QTIP. A white cotton swab sits on the table in front of the blocks, and a white cup with a handle wits behind the blocks with several cotton swabs propped up inside of it. A blue push pin is on the upper left corner of the picture.

Today’s q tip: 

I’ve noticed that the addition of water will help speed up the rusting process.  With outdoor items, I just leave them outside and wait for a good rain.  But for indoor items I will often give them a spritz of water using my Dixie Belle Fine Mist Spray Bottle once the initial Green spray has dried. 

It ended up taking a few weeks for the bases on my planters to rust up enough to match the rest of the pot. 

A brown ornamental pot sits on a cement floor with dirt around it, showing the rusty pot refresh. Inside the pot is brown dirt, green plants are also inside the pot.

But it looks pretty seamless to me now.

What do you think?  Leave a comment and let me know. 

We hope you loved Linda’s tutorial on refreshing rusty iron planters with Dixie Belle Patina Paint. Her tips make it easy to achieve beautiful results. Thanks to Linda for sharing her expertise! If you would like to try more Patina projects, check out this blog, How to Use Iron Patina Paint with Green Spray.  Share your transformations with us, and stay tuned for more DIY projects from Dixie Belle Paint.

A photo of a brown planter pot sitting on a cement ground with greenery and purple flowers coming out of the top. The background behind the photo is brown rust, and the words Guest Blog rusty pot refresh q is for quandie Dixie Belle 10th Anniversary are printed below the photo.


About the Author

Q is for Quandie

Linda is the creator of Q is for Quandie. She loves finding a beat up old piece of furniture and transforming it into something fabulous. There is just something supremely satisfying about taking a banged up, vintage item and turning it into something that someone out there is going to totally love.

View All Articles